An official website of the United States government
Heads up! IPP will be temporarily unavailable from Thursday, July 23 at 6:00 PM ET until Monday, July 27 at 8:00 AM ET while we complete scheduled maintenance. Thank you for your patience!
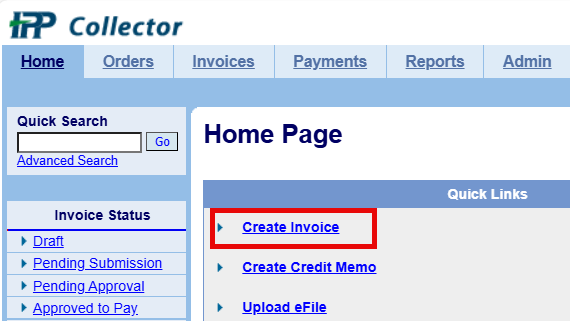
Getting Started with the IPP Collector Module
Welcome to IPP!
The Invoice Processing Platform (IPP) is a secure, Web-based service for federal agencies and their vendors that manages government invoicing from purchase order (PO) through payment notification.
New to IPP?
Enrollment will be initiated by the agency with which you are doing business. Once an agency has enrolled you, as the initial vendor administrator you will receive an email from IPP asking to either use an existing ID.me or Login.gov account or create a new one to log in to IPP.
Remember to use your IPP account email address, so we can automatically link you IPP account to your ID.me or Login.gov account. If you use a different email address, we will not be able to link your account.
If an existing ID.me account will be used, users must ensure that their IPP account email address is added to the account as the primary email address.
Log in to IPP
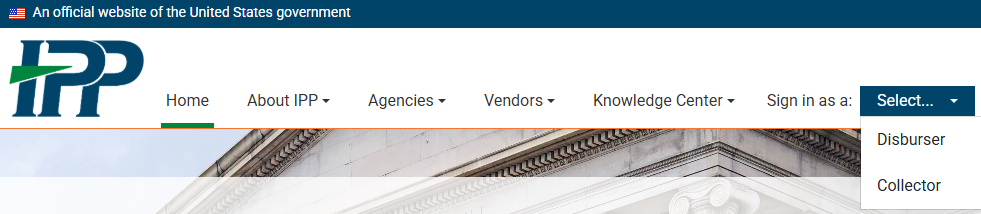
While on the IPP Website, On the top right, click Collector from the 'Sign in as a:' list.
On the log-in screen, click ID.me or Login.gov.
IPP.gov header with main navigation items and sign-in options
Tips
Search: The % symbol acts as a search wildcard on each of the tabs in the Collector module. When you type % in a search box and click Go, the search results display all content.
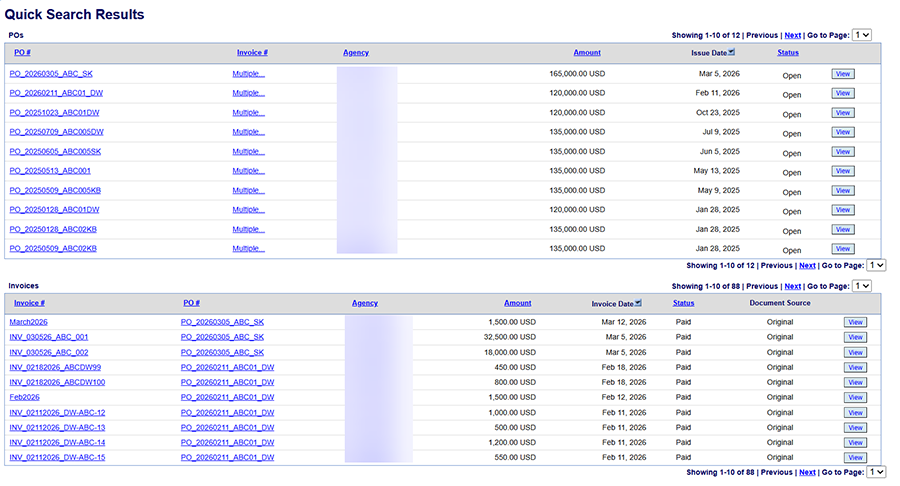
Quick Search: From the Home tab, you can view your purchase orders, invoices, and payment activity on one screen. To do this, click the Go button next to the Quick Search box (or type % in the Quick Search box and click Go). From here, you can make edits and take action as your permissions allow.
Common How-Tos
See below for instructions on performing common tasks (ex: find and view POs, turn a PO into an invoice, check invoice status, and review payment information).
Conduct a Quick Search for POs, Invoices, and Payments
To view your purchase orders, invoices, and payment activity from the Collector module Home tab, do one of the following:
In the Quick Search box on the top left, click Go.
Or type % in the Quick Search box and click Go.
A snapshot of all the activity associated with your profile appears. To view an individual item, click the link in the first column or scroll to the far right and click View.
Note: To familiarize you with the IPP interface, the following procedures describe how to complete tasks from the Orders, Invoices, and Payments tabs. You can also complete these tasks from the Home tab by conducting a Quick Search, viewing a specific item (purchase order, invoice, etc.), and completing the subsequent steps in the instructions that follow.
Find and View Purchase Orders
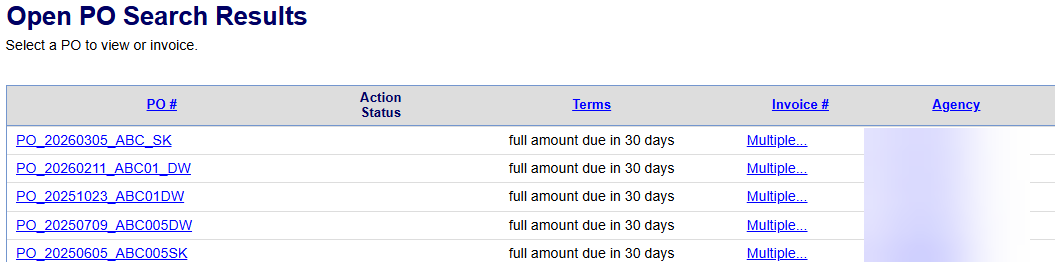
Click the Orders tab. By default, open POs for the last 30 days appear.
To view all your purchase orders, find the PO # or Agency search box on the top left and do one of the following:
Click Go.
Type % in the PO # or Agency box and click Go to use the wildcard symbol to search for all POs. Note: Click Advanced Search to enter specific search criteria.
On the PO Search Results page, locate the PO you want to view. From the PO # column, click the PO or scroll to the right and click View.
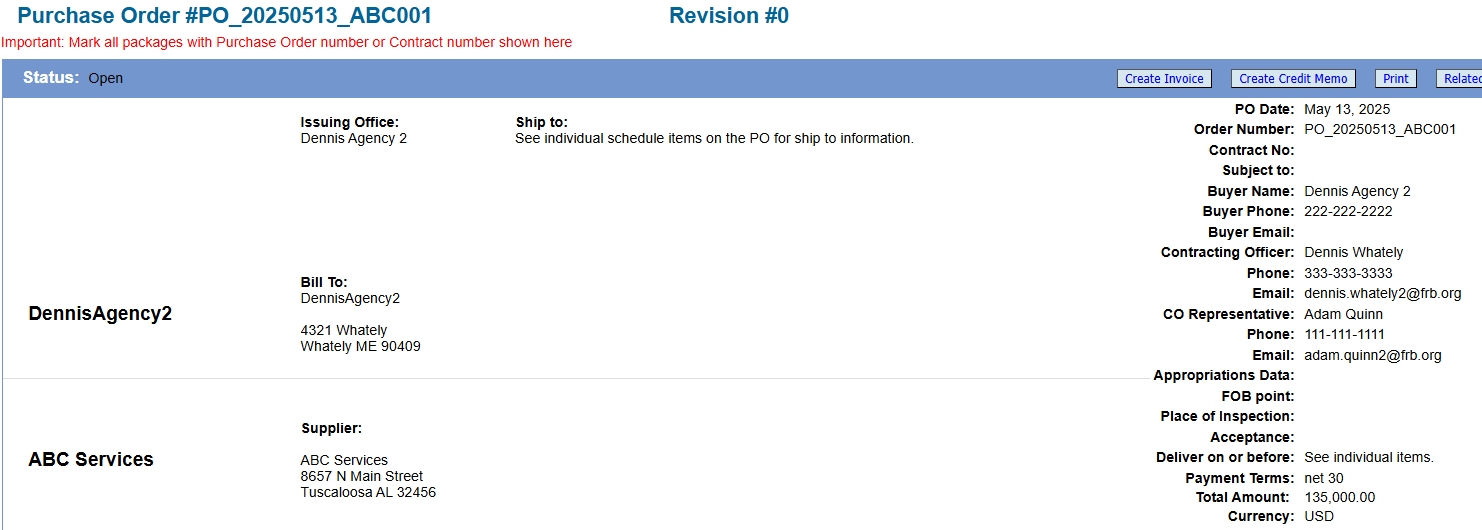
The PO selected appears.
Note: If there is only one PO on file, it will open by default.
Creating Invoices
There are several ways to create an invoice. Here we will show you how to create an invoice from a purchase order. For more information on other methods of creating invoices (including via an eFile upload or by copying an invoice from another invoice), see the IPP Collector User Guide.
Note: On the Home tab, check the Quick Links section to see if you have a Create Invoice link. If you see this link, you have the ability to create and edit invoices. If you do not see this link and need to create an invoice, contact the Collector Administrator for your organization to request the appropriate permissions.
Create an Invoice from a Purchase Order
Click the Orders tab. Find and view the PO you want to invoice using the previous procedure.
On the top right of the Purchase Order detail page, click Create Invoice. Note: Do not use the Create Invoice buttons outside of the PO (on the top and bottom left) for this procedure as doing so will create invoices from a blank form.
A new invoice page appears with information pre-filled based on the content of the PO.
Enter the information requested for the invoice.
Complete all required fields marked with an asterisk (*).
Type an invoice number. Be sure to adhere to any invoice numbering guidelines provided by your agency.
Use the format mm/dd/yyyy for date fields (if required).
Review the different PO lines at the bottom of page.
Enter information for the lines being invoiced (ex: dates).
Review the QTY and Unit Price fields and update accordingly.
If you are not invoicing for all the items in the PO, deselect the lines you do not want to include. To do this, uncheck the boxes to the left of the line item.
Enter comments (up to 240 characters) if required.
If required, add attachments to the invoice.
On the top or bottom right, click Attachments.
In the pop-up box, click Choose File and select your file attachment.
Click Open to select the attachment.
On the Attachments page, click Attach (top right). Then click Back to return to the Invoice page.
Once finished entering information for the invoice, do one of the following:
Click Save as Draft to view the invoice before submitting it. Saving as draft does not submit the invoice to the agency.
Click Submit. The submission confirmation pop-up will appear. Acknowledge by checking the box and click Confirm.
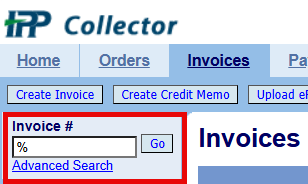
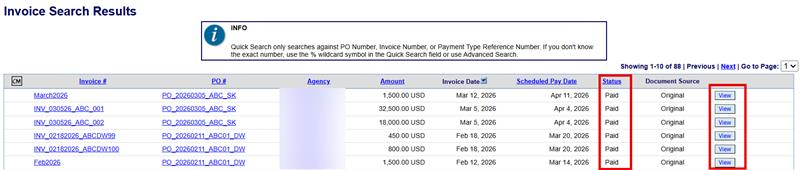
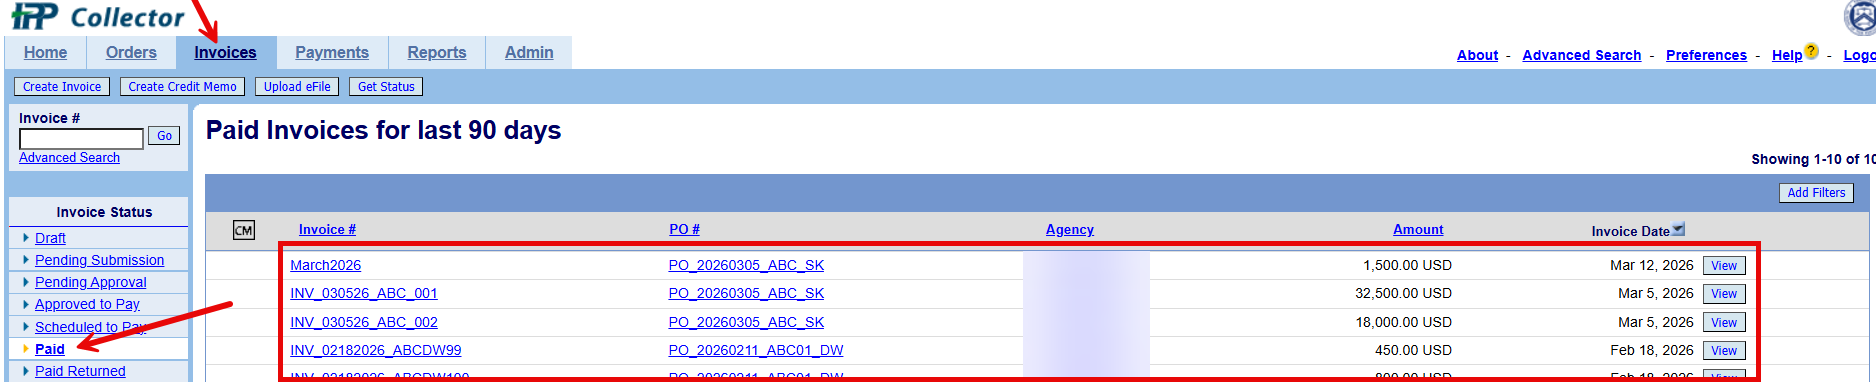
Check Invoice Status
Click the Invoices tab. By default, invoices pending approval for the last 90 days appear.
To view the status of your invoices, do one of the following:
For invoices from the last 90 days: From the Invoice Status column on the left, click one of the statuses (ex: Draft, Pending Submission, Approved to Pay, etc.). These default to a 90-day view of information.
For all invoices: In the Invoice # or Agency search box, click Go (or type % and click Go).Note: Click Advanced Search to enter specific search criteria.
The Invoice Search Results page appears. The Status column indicates the invoice status (ex: Pending Approval, Approved to Pay, In Exception, etc.). For more information about the invoice, go to the last column and click View.
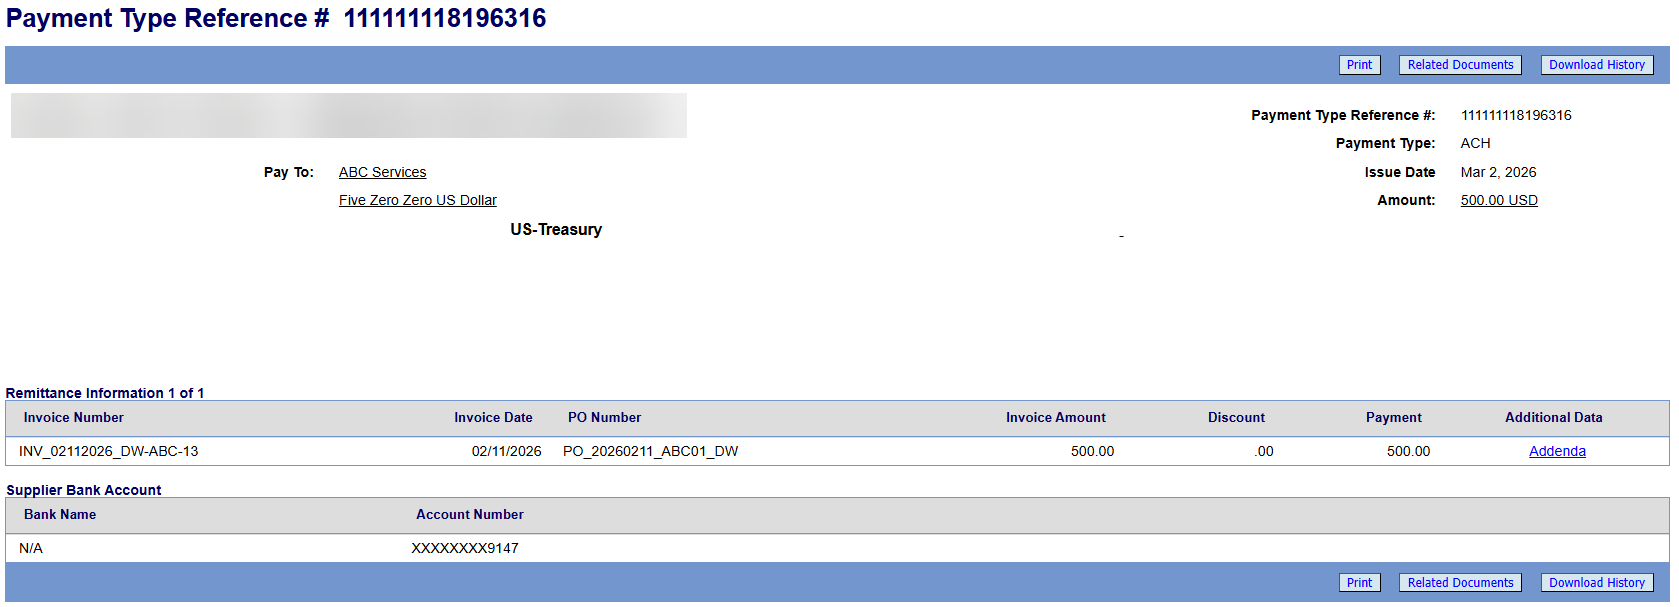
View Payment Information
Click the Payments tab. By default, payments for the last 90 days appear.
To view all your payments, in the Payment Type Reference # search box, click Go (or type % and click Go). Note: Click Advanced Search to enter specific search criteria.
Locate the line containing the payment data you want to display and click View. Payment information for the item selected appears.
Note: Paid invoices can also be displayed from the Invoices tab by clicking the Paid link on the left side. Click View to display payment data for a specific invoice.
Contact IPP
Have questions?
Call IPP Customer Support at (866) 973-3131. We’re available 8 am to 6 pm (ET) Monday through Friday (except federal holidays).